
Side Dishes
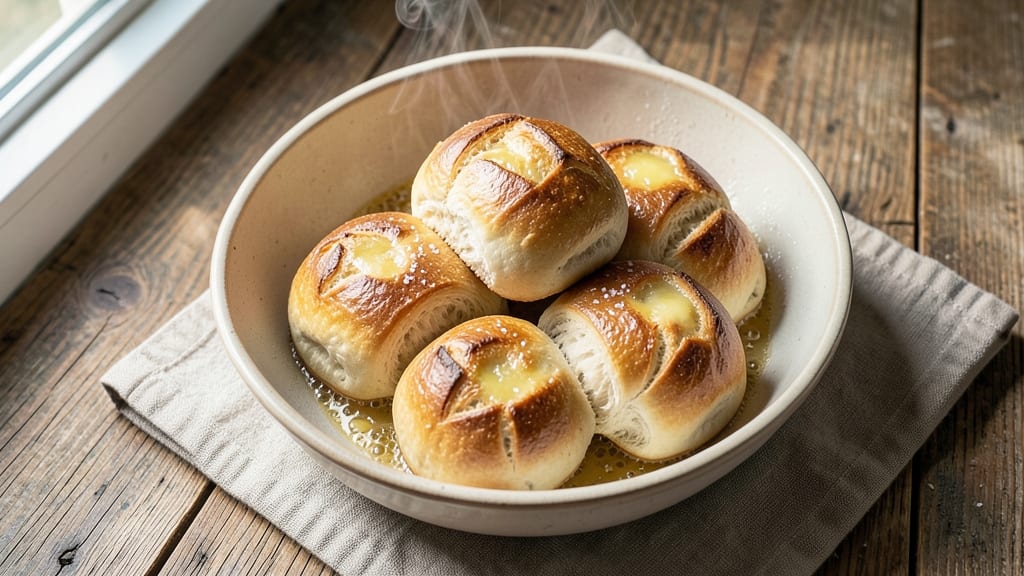
This active dry yeast bread rolls recipe delivers restaurant-quality softness with a golden crust—all in a single rise. The secret lies in proper yeast activation and gentle handling during shaping, which creates those signature air pockets that make every bite irresistible.
I've perfected this method over years of baking, ensuring consistent results even for beginners.
What sets these rolls apart is the balance between tender crumb and crispy exterior, achieved through precise dough hydration and controlled proofing. Unlike many recipes that require multiple rises, this version develops full flavor and texture in just one 90-minute rise, making it ideal for busy weeknights.
The dough's elasticity comes from proper kneading technique and resting time.
By the time they emerge from the oven, you'll have rolls with pillowy softness inside and a perfectly golden, slightly crisp crust. The aroma alone will have everyone gathering at your table, while the texture holds up beautifully even when sliced for sandwiches.
This is the kind of bread that transforms any meal from ordinary to extraordinary.
The beauty of this recipe lies in its versatility—serve them warm with butter, stuff with garlic and herbs, or use them as the base for sliders. The dough can be made ahead and refrigerated for up to 24 hours, giving you flexibility for when you're ready to bake.
Let's get started on creating your perfect batch.
Ingredients for active dry yeast bread roll
Nine simple ingredients transform into restaurant-quality bread rolls with a single rise.
| Ingredient | Amount | Notes |
|---|---|---|
| Active Dry Yeast 🍞 | 2 ¼ tsp | 1 packet or 7g total |
| Warm Water 💧 | 1 cup | 110°F for yeast activation |
| All-Purpose Flour 🌾 | 4 cups | King Arthur or similar |
| Granulated Sugar 🍚 | ¼ cup | For yeast activation |
| Unsalted Butter 🧈 | ½ cup | Cold, cubed for dough |
| Large Eggs 🥚 | 1 whole | Room temperature |
| Salt 🧂 | 1 ½ tsp | Diamond Crystal preferred |
| Milk 🥛 | ¼ cup | Warm for dough tenderness |
| Olive Oil 🫒 | 1 tbsp | For dough softness |
| Egg Wash 🥚 | 1 whole | 1 egg beaten with 1 tbsp milk |
| Coarse Sugar 🍚 | 1 tbsp | For golden crust |
The yeast is non-negotiable here—King Arthur brand or similar active dry yeast works best. Check the expiration date (fresh is key), and always test your yeast first by mixing with warm water and sugar—it should foam within 5-10 minutes. For the flour, bread flour gives better structure, but all-purpose works fine if that's what you've got. The butter should be cold—cubed and chilled—so it creates pockets of flavor without melting into the dough. I always grab the Land O'Lakes unsalted from the dairy section for consistency.
No yeast? Instant yeast works 1:1, but you'll need to dissolve it in the water first. Short on butter? Vegetable shortening at the same amount keeps the rolls tender. The milk can be swapped for warm water or plant-based milk (like oat milk), though dairy gives the best texture. For the egg wash, any white wine you've got works too—just reduce the milk by 1 tbsp. The coarse sugar on top? Turbinado or raw sugar gives that perfect golden crust, but regular granulated sugar works in a pinch.
The dough can be made up to 24 hours ahead and refrigerated—just let it sit at room temp for 30 minutes before shaping. For extra flavor, add 1 tsp garlic powder to the dough or stuff with herbed butter before baking. Rolls keep well wrapped at room temp for 2 days or frozen for 3 months. Reheat in a 350°F oven for 5-10 minutes to restore freshness.
Why You'll Love This Recipe
- Pantry Staples Only: I swear by this recipe because it uses what’s already in my cupboard—no fancy ingredients, just flour, yeast, and butter. The yeast blooms fast in warm water, so I’m kneading and shaping in under 20 minutes. No last-minute grocery runs needed.
- Buttery Soft Magic: That cube of cold butter folded into the dough? It melts into flaky, golden layers while keeping the center pillowy. Honestly, the first time I bit into one still warm from the oven, I nearly dropped the pan. Worth the wait.
- Weeknight Workhorse: These rolls pair with everything—soups, sandwiches, or just buttered up for breakfast. I make a double batch on Sundays and freeze half; toss them straight from frozen into a hot pan for fresh rolls anytime. Zero effort, maximum reward.
- Budget-Friendly Bounty: A single batch feeds four, and the leftovers? Even better the next day. The sugar just barely sweetens the dough, but the yeast does all the heavy lifting—no expensive shortcuts, just reliable flavor. My wallet (and my family) thank me every time.
Step-by-step instructions for pillowy soft bread rolls
Here's how to make bread rolls with a tender crumb and perfect golden crust using just one rise.
Activate the Yeast for Maximum Rise
In a small bowl, combine the 1 cup warm water (about 110°F) with the 0.25 cup granulated sugar and 2.25 tsp active dry yeast. Stir gently with a whisk and let sit for 5-10 minutes until frothy. You'll see bubbles forming—this means your yeast is alive and ready to work. If it doesn't bubble, your yeast might be dead, and you'll need to start over.
This step is crucial because it jumpstarts your dough. The sugar feeds the yeast, helping it multiply quickly and create a light, airy texture in your rolls. I like to use a glass bowl so I can easily see the bubbles forming. Once it's bubbly, proceed immediately to the next step before it loses its energy.
Mix the Dough Until Just Combined
In the bowl of a stand mixer fitted with the dough hook attachment, combine the 4 cups all-purpose flour and 1.5 tsp salt. Mix on low speed to distribute evenly. In a separate small bowl, whisk together the 0.5 cup cold cubed butter, 0.25 cup warm milk, and 1 tbsp olive oil. Pour this wet mixture into the flour while the mixer runs on low.
Add the yeast mixture from Step 1 and mix until just combined—about 2 minutes. The dough will look shaggy at first, but don't be tempted to add more flour. This is normal! The gluten needs time to develop, and adding extra flour now will make your rolls denser. You'll see the dough start to pull away from the sides of the bowl as it comes together.
Knead Until Smooth and Elastic
Increase the mixer speed to medium and knead for 5-7 minutes until the dough is smooth and elastic. It should be slightly tacky but not sticky—if it sticks to your fingers, add 1 tsp flour at a time until it releases cleanly. The dough should form a windowpane when you stretch a small piece—this means it's properly kneaded and ready for the next step.
I know it's tempting to rush this step, but proper kneading develops gluten, which gives your rolls that perfect pillowy texture. If you're doing this by hand, knead for about 8-10 minutes until the dough is smooth and springs back when poked. Once kneaded, lightly oil a large bowl, place the dough inside, and cover with a damp towel or plastic wrap.
Let the Dough Rise Until Doubled
Place the covered dough in a warm spot (like a turned-off oven with a bowl of hot water inside) and let it rise for 1-1.5 hours or until it has doubled in size. You'll know it's ready when you press two fingers gently into the dough and it springs back slowly. This slow rise allows the gluten to relax, making your rolls tender rather than chewy.
I always check the dough after 45 minutes to make sure it's rising properly. If it doesn't double in this time, your yeast might need more warmth. A cold kitchen can slow this process, so if needed, place the dough closer to a heat source. Once doubled, punch down the dough to release any air bubbles and shape it into 12 equal-sized rolls on a parchment-lined baking sheet.
Proof, Bake, and Finish for Golden Crust
Cover the rolls loosely with a clean kitchen towel and let them proof for another 30-45 minutes until they've puffed up noticeably. While they proof, preheat your oven to 375°F. In a small bowl, whisk together the 1 whole egg wash (1 egg beaten with 1 tbsp milk). Brush this mixture over the tops of the rolls just before baking.
Sprinkle the 1 tbsp coarse sugar evenly over the brushed rolls—this will create that beautiful golden crust. Bake for 15-18 minutes until the rolls are golden brown and sound hollow when tapped on the bottom. Let them cool on a wire rack for 5 minutes before serving. The rolls will be soft and warm inside with a crisp, caramelized exterior—perfect for serving with soup or butter.
Pro Tips For Making Active Dry Yeast Bread Roll
- Dissolve Yeast First: I learned this the hard way—don’t just toss active dry yeast into the flour. Sprinkle it into the warm water (110°F) with a pinch of sugar first, let it sit for 5 minutes until foamy. That’s when you know it’s alive and ready to work, not when you’re kneading and wondering why your dough’s sluggish.
- Use a Kitchen Scale: Measuring flour by scooping from the cupboard is a recipe for disaster. Weigh it instead—500 grams of flour gives you consistent rolls every time. (Yes, even if you’re impatient like me, the difference in texture is noticeable.)
- Don’t Overwork the Dough: Once the dough comes together, handle it just enough to smooth it out. Over-kneading develops gluten too much, and your rolls turn out dense instead of light. Two minutes of gentle stretching and folding is all you need—no marathon sessions required.
- Chill Before Shaping: Skip the rush to shape those rolls right after the first rise. Pop the dough in the fridge for 30 minutes first. The cold firmness makes rolling and cutting cleaner, and the flavor develops better—no more sticky messes or uneven shapes. (Your future self will thank you.)
Dietary considerations for these flavors
Gluten-Free Adaptation
For a gluten-free version, replace the 4 cups all-purpose flour with a 1:1 gluten-free flour blend like King Arthur Measure for Measure. Add 1 tsp xanthan gum to help bind the dough, as gluten-free flours lack natural elasticity.
You may need to adjust the liquid slightly—start with 2 tbsp less water and add more gradually until the dough comes together. Proofing times may also be shorter, so check your rolls after 20-30 minutes in the final proof. 🌾
Vegan Substitutions
Swap the 1 whole egg for 1 tbsp ground flaxseed mixed with 3 tbsp water (let it sit for 5 minutes to thicken). Use vegetable shortening instead of butter, and replace the 0.25 cup warm milk with unsweetened almond or oat milk.
For the egg wash, use 1 tbsp melted vegan butter mixed with 1 tbsp plant-based milk. The texture will be slightly denser but still tender. 🥛
Dairy-Free Options
Omit the butter entirely and use ½ cup coconut oil (solid at room temperature) or vegetable shortening instead. Replace the milk with warm water or dairy-free milk, and for the egg wash, use 1 tbsp olive oil mixed with 1 tbsp water.
The rolls will still achieve that golden crust, though they may have a slightly softer texture. 🧈
Low-Carb Modifications
Reduce the 4 cups all-purpose flour to 3 cups and add 1 cup almond flour for a lower-carb option. Cut the sugar to 2 tbsp and use 1 tbsp erythritol or monk fruit sweetener instead.
The dough will be slightly drier, so add 1 tbsp extra olive oil to maintain tenderness. Proofing may take 10-15 minutes longer due to the almond flour’s absorption. 🍚
Allergy-Friendly Notes
Always check labels for hidden allergens—some brands of active dry yeast or flour blends may contain traces of dairy, eggs, or soy. For nut-free kitchens, use a certified gluten-free oat flour instead of almond flour.
If you're sensitive to sulfites, opt for a yeast brand labeled "sulfite-free." Cross-contamination is key—use separate utensils and surfaces if allergies are severe. 💡
Nutrition facts
Frequently asked questions
Why does my dough look shaggy after mixing?
This is completely normal! The dough will appear uneven at first because gluten needs time to develop. Avoid adding extra flour—this disrupts the gluten structure. Keep mixing until the dough starts pulling away from the bowl sides (about 2 minutes on low speed). The shaggy stage is temporary and essential for that perfect pillowy texture.
Can I make these rolls without a stand mixer?
By hand, knead the dough for 8-10 minutes on a lightly floured surface until smooth and elastic. Use the "windowpane test"—stretch a small piece until it's translucent. If it tears, knead another 2 minutes. The extra effort ensures that signature tender crumb, even without a machine.
What's the best way to test if the yeast is active?
Mix 1 tsp yeast with 2 tsp warm water (110°F) and 1 tsp sugar in a small bowl. If it bubbles within 5-10 minutes, your yeast is alive and ready. No bubbles? Your yeast may be dead—replace it and try again. Always check expiration dates, as old yeast loses potency.
How do I fix rolls that are too dense?
Dense rolls usually mean over-kneading or insufficient proofing. For next time, knead just until smooth (not tough), and ensure the dough doubles in size during the 1-1.5 hour rise. If your rolls are already baked, try reheating them in a 350°F oven for 5 minutes with a damp paper towel to restore some moisture.
Can I make these rolls ahead of time?
Yes! Shape the rolls and refrigerate them overnight, covered. Let them sit at room temperature for 30 minutes before the final 30-45 minute proof. This cold fermentation enhances flavor. For storage, wrap cooled rolls in plastic and keep at room temp for 2 days or freeze for 3 months—reheat in the oven to refresh.