
Side Dishes
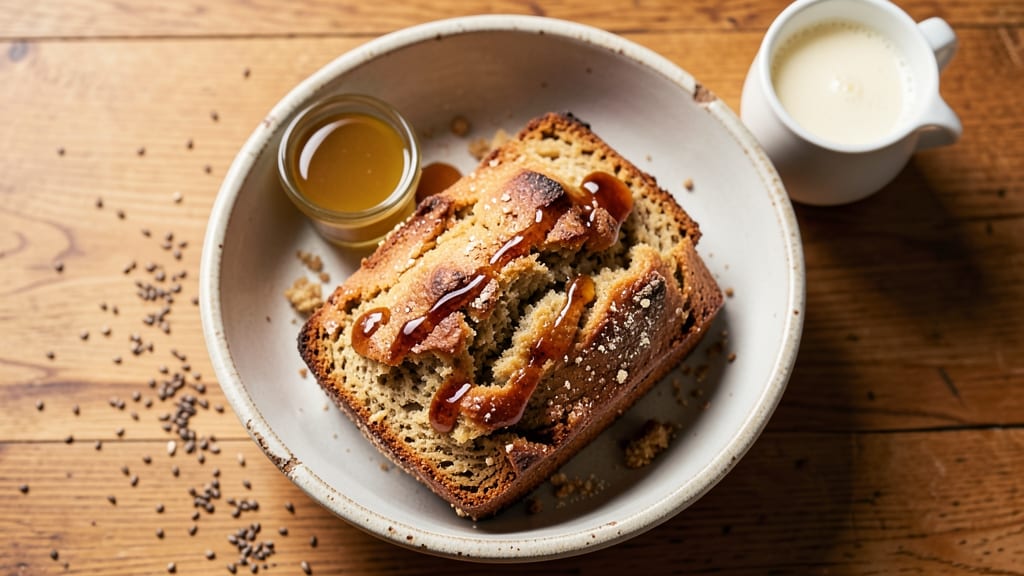
This gluten-free almond flour soda bread delivers the perfect balance of nutty flavor and crisp texture without traditional wheat. The secret lies in almond flour's natural binding ability and a simple leavening system that creates a light, airy crumb—ideal for sandwiches or serving alongside soups.
Unlike conventional soda bread, this version requires no yeast, making it quick to prepare while still achieving a satisfying rise.
The recipe relies on a precise ratio of almond flour to moisture, ensuring the bread stays tender yet sturdy enough to hold up to slicing.
A touch of apple cider vinegar activates the baking soda for lift, while a sprinkle of seeds or herbs on top adds visual appeal and extra texture. The result is a bread that's naturally sweet, slightly crisp at the edges, and packed with the rich, buttery notes of almond flour.
Baking at 350°F for 35-40 minutes yields a golden-brown loaf with a fragrant aroma that fills your kitchen. The crust develops a satisfying crunch, while the interior remains soft and moist—no dryness here. This bread is perfect for those avoiding gluten but craving the comfort of a classic soda bread.
The nutty depth makes it versatile for toast, French toast, or even as a side to savory dishes.
For best results, let the dough rest for 10 minutes before baking to hydrate the almond flour fully. Optional add-ins like sunflower seeds or rosemary elevate the flavor further, but the base recipe stands strong on its own.
Once cooled, it keeps well for 3-4 days in an airtight container, making it a great make-ahead option for meal prep.
Ingredients for almond flour soda bread
Pantry staples with a nutty twist—this gluten-free bread needs just 11 ingredients for a perfect rise.
| Ingredient | Amount | Notes |
|---|---|---|
| Almond Flour 🌰 | 2 ½ cups | Finely ground, unsweetened preferred |
| Unsweetened Almond Milk 🥛 | 1 cup | Room temperature for best results |
| Apple Cider Vinegar 🍎 | 1 tbsp | For tangy lift and activation |
| Baking Soda 🧂 | ½ tsp | Pure, aluminum-free preferred |
| Maple Syrup 🍁 | ¼ cup | Grade B for richer flavor |
| Ground Flaxseed 🌾 | 1 tbsp | For egg replacement binder |
| Water 💧 | 3 tbsp | To activate flaxseed |
| Sunflower Seeds 🌻 | ¼ cup | Optional topping for crunch |
| Sea Salt 🧂 | ½ tsp | Fine grain preferred |
| Fresh Rosemary 🌿 | ¼ cup | Chopped, optional herb topping |
| Olive Oil 🫒 | ½ tsp | For greasing loaf pan |
Almond flour is the star here—Bob's Red Mill or Anthony's Goods brands are my go-tos for ultra-fine grind. The finer the flour, the better the texture. Check the date—almond flour goes rancid fast, so if it smells nutty but stale, toss it. For the milk, unsweetened vanilla almond milk adds subtle flavor, but plain works too. The flaxseed binder is non-negotiable—ground fresh makes all the difference, but pre-ground is fine in a pinch. Store your almond flour in the freezer to preserve freshness for up to 6 months after opening.
No almond milk? Oat milk or coconut milk works in a bind, but avoid sweetened versions. Short on vinegar? Lemon juice at the same amount gives similar lift. The maple syrup can be swapped for agave or coconut sugar—just reduce by 1 tbsp since it's less sweet. For the seeds, pumpkin seeds or sesame seeds are great alternatives. Fresh herbs like rosemary or thyme can be swapped in, but dried works at half the amount. The baking soda needs to be fresh—if it's over 6 months old, test it first by mixing with vinegar to see if it bubbles.
This dough is sensitive—don't overmix after adding wet ingredients. Let it rest 10 full minutes before baking to hydrate properly. The loaf keeps best in an airtight container for 3 days at room temp or 1 week in the fridge. For longer storage, freeze slices wrapped in parchment for up to 3 months. Reheat slices in a toaster or oven at 300°F for 5 minutes to restore crispness. The crust gets crunchier as it cools, so slice when still slightly warm for cleaner cuts.
Why You'll Love This Recipe
- Five-Ingredient Magic: I swear by this—just almond flour, almond milk, vinegar, baking soda, and a drizzle of maple syrup. No yeast, no kneading, no stress. The batter comes together faster than I can scramble eggs.
- Nutty Sweet Crunch: That first bite? Warm, tender crumb with a crisp edge and a whisper of caramel from the maple syrup. Honestly, it’s the kind of bread that disappears in minutes, even when I’m trying to ration slices.
- No-Waste Flexibility: Make a big batch—it’s perfect for breakfast toast, sandwiches, or even crumbled over salads. Between us, I’ve used the leftovers for three days straight, and it still tastes fresh. (Yes, even on a Tuesday night.)
- Budget-Friendly Indulgence: Almond flour might sound fancy, but it stretches further than regular flour—this loaf feeds my whole family with minimal cost. Plus, the vinegar and baking soda are pantry staples, so you’re not breaking the bank for a treat.
Step-by-step instructions for almond flour soda bread
Here's how to bake a perfectly crisp-edged, nutty loaf that rises beautifully without gluten.
Activate the Flax Egg and Prepare Wet Ingredients
In a small bowl, whisk together the 1 tablespoon ground flaxseed and 3 tablespoons water. Let it sit for 5 minutes until it thickens into a gel-like consistency—this is your egg substitute. Meanwhile, in a separate bowl, combine the 1 cup unsweetened almond milk with 1 tablespoon apple cider vinegar. Stir and let it curdle for 2 minutes—this mimics buttermilk's tangy lift.
The flax egg binds the dough while the vinegar-activated milk creates that signature soda bread tang. I always use room-temperature almond milk for better emulsification—cold milk can make the batter separate. If you notice any separation, just whisk vigorously to re-combine before moving forward.
Mix Dry Ingredients and Combine Wet Components
In a large mixing bowl, combine the 2.5 cups almond flour, 0.5 teaspoon baking soda, and 0.5 teaspoon sea salt. Whisk gently to distribute the baking soda evenly—this prevents bitter pockets. In the same bowl, pour in the flax egg mixture, curdled almond milk, and 0.25 cup maple syrup. Stir until just combined, being careful not to overmix. The batter should be thick but pourable—think pancake batter consistency.
Here's the thing—almond flour absorbs moisture differently than wheat flour. If your batter looks too dry, add 1 tablespoon more almond milk at a time until it reaches the right consistency. The goal is a smooth, cohesive batter that holds its shape when dropped but still spreads slightly when baked.
Prepare the Loaf Pan and Preheat the Oven
Preheat your oven to 350°F. Lightly grease a 9x5-inch loaf pan with 0.5 teaspoon olive oil, then dust it with a thin layer of almond flour (tap out any excess). This prevents sticking and gives the bread that beautiful golden crust. While the oven heats, fold the 0.25 cup chopped fresh rosemary and 0.25 cup sunflower seeds into the batter by hand—just until evenly distributed. Overmixing now could develop gluten-like proteins in the almond flour.
I like to press the batter gently into the prepared pan, filling it about ¾ full. The bread will rise slightly during baking, but not as dramatically as traditional soda bread. Tap the pan gently on the counter once to remove any air bubbles from the surface—this ensures an even rise and crackly crust.
Bake Until Golden and Crisp
Bake for 40-45 minutes until the top is deep golden brown and a toothpick inserted in the center comes out clean. The bread is done when it sounds hollow when tapped on the bottom—this takes practice, but you'll get the hang of it. If the top browns too quickly before the center is done, loosely tent the pan with aluminum foil after 25 minutes and continue baking.
Don't walk away during the last 10 minutes of baking. The almond flour bread develops its signature crispness in those final moments. When you pull it from the oven, let it cool in the pan for 10 minutes before transferring to a wire rack. This resting period prevents the bread from crumbling when you slice it—trust me, it makes a difference.
Slice and Serve Warm
Once cooled for 15 minutes, slice the bread with a serrated knife. The interior should be tender with a slightly crumbly texture, while the exterior remains crisp. Serve warm with grass-fed butter or olive oil for dipping. The rosemary adds a fresh herbal note that pairs beautifully with the nutty almond flavor, while the sunflower seeds provide satisfying crunch in every bite.
This gluten-free loaf holds up well for 2-3 days at room temperature, but it's best enjoyed fresh when the crust is at its crispest. For extra crispiness, brush the warm slices with melted butter and toast briefly in a dry skillet—it transforms into something truly special.
Pro Tips For Making Almond Flour Soda Bread
- MEASURE ALMOND FLOUR BY WEIGHT: Almond flour is deceptive—scooping it straight from the bag packs it down, giving you way more than you need. Use a kitchen scale for accuracy, or at least fluff it with a fork before scooping into your measuring cup. Trust me, your bread’s texture will thank you.
- LET THE BATTER REST 10 MINUTES: I used to skip this and wondered why my bread turned out dense. Mix your wet and dry ingredients, then let the batter sit while you preheat the oven. The baking soda and vinegar need time to react fully—this small pause makes a real difference in rise and crumb.
- DON’T OVERMIX THE DOUGH: Almond flour bread is delicate. Once you’ve combined everything, stir just until the baking soda and vinegar fizz out—about 10-12 strokes with a spatula. Overmixing develops gluten (which almond flour lacks), and your bread will turn out tough instead of tender.
- USE A LIGHT HAND WITH MAPLE SYRUP: This isn’t a pancake batter—too much syrup makes the bread gummy. Start with 2 tablespoons and taste the batter before adding more. If it’s too sweet, you’ll end up with a dense, sticky loaf instead of a light, airy one. (I learned this after a disastrous batch.)
Common mistakes when making this recipe
Overmixing the Batter
Almond flour lacks gluten, so it can't handle vigorous mixing like wheat flour. Once you combine the wet ingredients, stir just until everything is incorporated—about 10-12 strokes with a spatula. Overmixing develops a tough, dense texture that defeats the purpose of this tender, crumbly bread.
I've ruined batches by blending too aggressively, so resist the urge to "get it all in there." 🌰
The batter should look thick but pourable, like pancake mix. If it separates slightly, that's normal—just gently fold it together. Remember, almond flour releases starches when mixed too much, creating a gummy consistency. The key is patience and a light hand.
Skipping the Rest
That 10-minute rest before baking isn't optional—it's crucial for proper hydration. Almond flour absorbs moisture differently, and rushing this step often leads to a dense, crumbly loaf that falls apart when sliced.
I've learned this the hard way after impatiently popping bread in the oven too soon. Let the batter sit covered at room temperature while you preheat.
During this time, the flax egg fully gels and the almond flour absorbs all the liquid. This creates the perfect balance of moisture for a tender crumb. If you're in a hurry, at least wait 5 minutes—you'll still get better results than skipping it entirely.
Using Old Almond Flour
Freshness matters more with almond flour than wheat flour because it goes rancid quickly. If your flour smells nutty but stale, toss it—rancid almond flour will make your bread taste bitter. I keep mine in the freezer to preserve it for up to 6 months after opening.
The Bob's Red Mill brand I use has a date stamp, and I always check before baking.
For the best flavor, use almond flour within 3 months of opening. If you're unsure about freshness, do the "sniff test"—it should smell clean and nutty, not like old peanut butter. The flavor difference in your bread will be noticeable.
Incorrect Pan Preparation
Greasing your pan with just oil isn't enough—you need that dusting of almond flour to prevent sticking. I've had breads tear apart when pulled from pans that weren't properly prepared.
Lightly grease with olive oil, then dust with a thin layer of almond flour, tapping out any excess. This creates a non-stick barrier while adding to the bread's signature crust.
Using a non-stick pan without flour can still cause sticking, especially with almond flour's dense texture. The flour coating also helps create that beautiful golden crust. For extra insurance, I sometimes line the pan with parchment paper before adding the batter.
Baking at Wrong Temperature
Almond flour bread needs 350°F—any hotter and the exterior burns before the center cooks. I've had batches where the top was dark and crispy while the middle stayed raw.
If your oven runs hot, reduce to 325°F and add 5-10 minutes to the baking time. Use an oven thermometer to verify your oven's accuracy.
Conversely, baking at too low a temperature (below 340°F) can result in a pale, gummy loaf that doesn't develop proper crispness. The 40-45 minute window at 350°F gives you the perfect balance of golden crust and tender interior.
Cutting Too Soon
Almond flour bread continues setting as it cools, which is why slicing too early leads to crumbly, messy pieces. Wait at least 15 minutes before cutting—this gives the structure time to firm up.
I've had breads fall apart when sliced too soon, especially when adding seeds or herbs. The interior needs time to firm up while maintaining its tender texture.
For cleaner slices, let it cool completely (about 30 minutes) before using a serrated knife. The bread will be easier to slice and less likely to crumble. If you're impatient, at least wait 10 minutes before attempting to cut—you'll still get better results than slicing immediately.
Nutrition facts
Frequently asked questions
Can I substitute coconut flour for almond flour in this recipe?
Not directly—coconut flour absorbs 4x its volume in liquid, requiring major adjustments to the recipe. For a 1:1 swap, you'd need 1 cup coconut flour plus 3 cups water per 1 cup almond flour, plus an extra 1 tsp baking soda to balance acidity. The texture would be denser and less tender. For best results, stick with almond flour or try a 50/50 blend with another gluten-free flour like tapioca.
Why does my almond flour bread turn out dense instead of light?
Overmixing or skipping the 10-minute rest are the top culprits. Almond flour lacks gluten, so gentle folding is key—stir just until combined. Also ensure your almond flour is fresh (no rancid smell) and your baking soda is active (test with vinegar). If the batter seems too dry, add 1 tbsp almond milk at a time until it reaches pancake-batter consistency.
How can I make this bread sweeter without adding more syrup?
Swap the 0.25 cup maple syrup for 0.25 cup honey or agave (reduce other liquids by 1 tbsp to balance). For extra sweetness, fold in 2 tbsp dried fruit (like raisins or chopped dates) or 1 tbsp cinnamon with the seeds. The natural sweetness of almond flour also enhances flavor—just let it bake longer (5 extra minutes) for deeper caramelization.
Is this bread safe for nut allergies?
No—this recipe contains almond flour, which is a tree nut. For nut-free versions, use a sunflower seed flour (like SunButter) or oat flour (certified gluten-free). The texture will differ slightly, but the method remains the same. Always check labels on almond-free flours for cross-contamination warnings.
Can I bake this in a different pan shape?
Yes! Try a round 8-inch cake pan (bake 30-35 minutes) or mini loaf pans (bake 25-30 minutes). For a freeform loaf, shape the batter on a parchment-lined baking sheet and bake 20-25 minutes at 350°F. The baking time decreases because the surface area is larger. For even baking, rotate the pan halfway through if using a sheet.